

Build a Docker Image from a Github Repository
In this tutorial we will learn how to build a Dockerfile hosted at Github in a completely automated way, using Docker Hub.
Prerequisites:
- A Github account
- A Docker account
- A working Docker installation on your pc
In case you need help installing Docker, you can find a detailed guide here on the Docker website.
If you are using Windows or Mac, I suggest that you install Docker for Windows/Mac.
If you are using Linux, you can find here a guide on how to install Docker.
Watch Out! If you are using Linux, you have to run all of the docker commands using sudo or it will not work.
For this tutorial I will assume that you have some basic knowledge of how to create a Github repository.
If this is your first time working with Github, take a look at this great introductory tutorial to get started!
In case you have never created a Docker repository, take a look at the official guide, we will however cover those steps in this tutorial!
Set up a Github repository
First of all, we need to setup a Github repository to host our Dockerfile.
There are many ways to organize your repository. In a general case, we have several folders containing the documentation of the project, the source, ecc. For this tutorial, I will create a folder in my repository containing the examples for this website, and there I will place my Dockerfile.
You can place your Dockerfile wherever you want, even at the root of the repository, just note down the path to it.
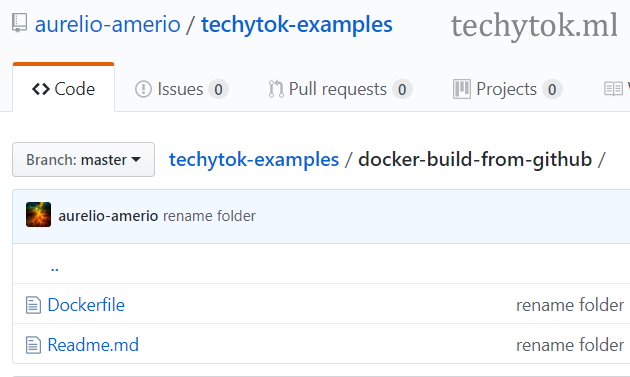
For this tutorial we will use the following Dockerfile:
FROM busybox
MAINTAINER Aurelio Amerio

CMD ["echo", "Hello World! This is TeckyTok!"]
Set up a Docker Hub repository
Go to Docker Hub and, once you are logged in follow this guide to link your Github account to your Docker account.
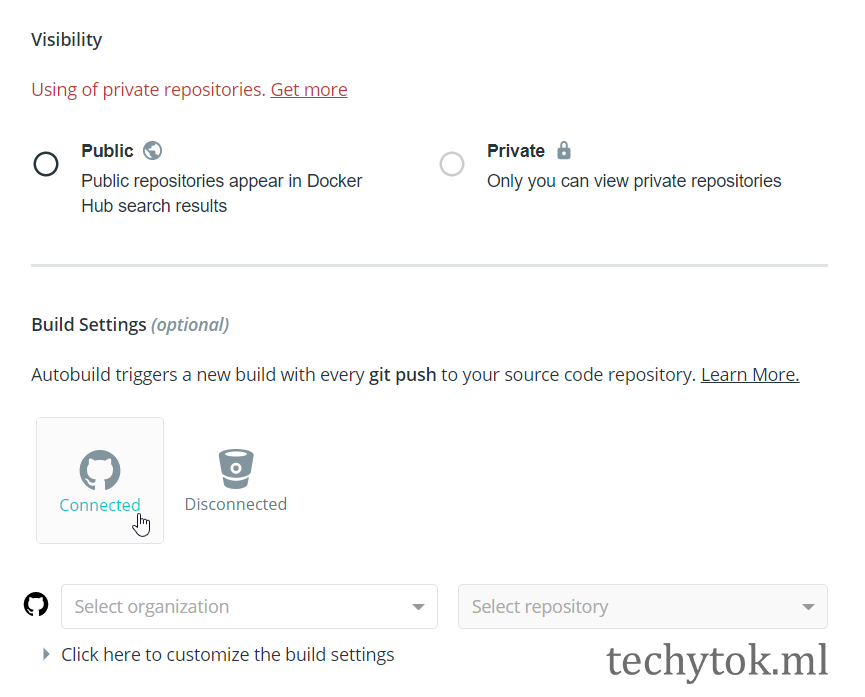
Once Github is linked, you can proceed to create a Docker repository. Go to the Docker Hub homepage and click on Create Repository. Choose the name of the repository and set it to public (or private, if you don’t already have a private repository).
Once you have created a Docker Hub repository, you cannot change its name. I therefore suggest that you choose a meaningful name.
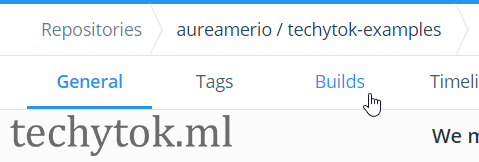
Open your newly created repository (or an existing one, if you prefer) and click on the Builds tab.
Now press Configure Automated Builds (top right corner) and select your Github repository.

It is now time to create the build rule, compile the module as follows:
- Source type: branch
- Source: master (or whichever branch contains the Dockerfile)
- Docker Tag: an explicative name for the build (hello-world for example)
- Dockerfile location: Dockerfile
- Build Context: the name of the folder containing your Dockerfile (in my case
/docker-build-from-github) - Autobuild: it is up to you if you want to keep it switched on, I usually don’t
- Build caching: yes

Now press Save and Build to trigger the build of your image.
Once the building process is completed you should see a green “success” icon: this means that the image has been created and is ready to be downloaded/executed.

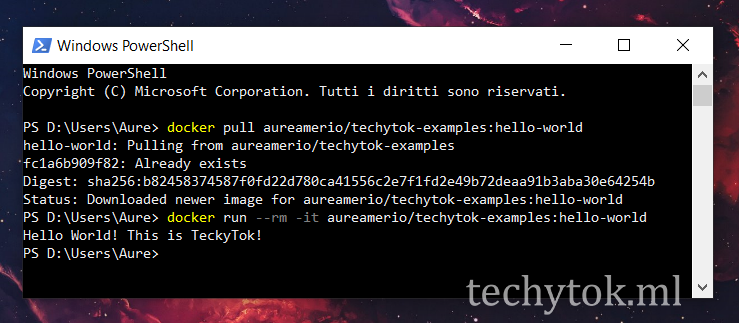
Open a terminal (or a power shell) and type:
docker run --rm -it YOURNAME/YOURREPO:yourtag
which translates, in my case, to:
docker run --rm -it aureamerio/techytok-examples:hello-world
You should see a welcome message, meaning that the build and execution process was successful.
Conclusions
You have learned how to build a Docker image from a Github repository. You may now have multiple folders with different Dockerfiles and have several tags in you repository corresponding to that images.
If you liked this guide and you would like to receive further updates on what is being published on this website, I encourage you to subscribe to the newsletter! If you have any question or suggestion, please post them in the discussion below!
Thank you for reading this guide and see you soon on TechyTok!


Leave a comment