Julia and Docker integration
In this guide we will learn how to setup a fully containerized development environment for the Julia language. We will show you how to connect a docker container to both VSCode and Atom, though it is suggested to use VSCode as the procedure is simpler and the Julia extension for Atom is no longer under active development.
We will go through the following steps:
- Install Docker
- Install DockStation
- Create a Julia container
- Install and configure VSCode
- Connect to the Docker container from VSCode
- Install Atom
- Install and configure Juno IDE
- Connect to the Docker container from Atom
But first, what are Julia and Docker? The following two paragraphs are meant to give you some context but they are not needed in order to follow through the tutorial. If you can’t wait getting to work with Julia, you can directly skip to Install Docker!
About the programs
Julia
Julia is a high-level dynamic programming language designed to address the needs of high-performance numerical analysis and computational science, without the typical need of separate compilation to be fast, while also being effective for general-purpose programming, web use or as a specification language.
When programming, especially for scientific computations, one has to come into terms with both the complexity of the problem and the task of writing a good code. In physics, we want our code to run fast, but as we are not programmers we want also to quickly build a program to test new ideas.
Python is considered one of the best languages (in the scientific world) for its simplicity and the vast community, but it tends to be slow and it doesn’t always use all the computational resource we have at hand. Thus, core libraries for computation are implemented using “low level languages” such as C++ or Fortran, and they are then called by Python functions.
Languages like C++ and Fortran can be blazing fast, as the binaries are optimized for the machine they run on, but on the other hand it is difficult to code fluently in those languages. That’s the reason why ideas are often quickly prototyped using Python and then they are re-implemented using C++ for deployment.
That is the so called two language problem, i.e the need to write the code two times, to cut it short.
Julia aims to solve this problem thanks to its JIT (Just In Time) compiler: coding in Julia is as easy as coding in Python, and thanks to the possibility to write type annotations and generate type optimized code, it can be almost as fast as compiled languages. You write the code, you can interact with the code in the REPL (like an IPython notebook) but functions are compiled as soon as you run them, making your code orders of magnitude faster, in some circumstances.
For some benchmarks you can look at this github repository.
If you want to learn more about Julia, you can look at its website and its wonderful documentation.
What is Docker?
Docker is a container technology for Linux that allows a developer to package up an application with all of the parts it needs.
Think of it as a Virtual Machine on steroids: it enables you to craft a developing environment in minutes with exactly the specs you need.
What I think is extraordinary about Docker, is that once you have built an image, you can install it on any machine running docker, and you can be sure that if you code works on your docker container, it will work anywhere else if you run it inside the same image.
This feature is extraordinary important, if you need to develop a program to analyze some data and you need to run it on a cluster: once you have submitted your code it will be run, and if there are some bugs it means that you have wasted computational power and possibly your research funds!
If you want to read more about docker, I encourage you to look at the project’s webiste.
Install Docker

First we need to install Docker. I will not delve into the details as the procedure is well explained here on the Docker website.
If you are using Windows or Mac, I suggest that you install Docker for Windows/Mac. For Windows users, if you can please install windows subsystem for Linux 2 (WSL2) and the WSL2 kernel as it makes Docker much faster.
If you are using Linux, you can find here a guide on how to install Docker. Furthermore, after you have installed Docker, you need to also install Docker Compose running, for example
sudo apt-get install docker-compose
Watch Out! If you are using linux, you have to run all of the docker commands using sudo or it will not work.
Install DockStation
This is an optional step, if you are already acquainted with Docker. DockStation is not required at all if you don’t want to use Docker with a GUI, though I think that it is a nice addition to have it.
DockStation is a free GUI for Docker which uses Docker Compose. Once you have installed it you are ready to start working with docker containers!
Create a Julia container
Ok, now that we have set up docker and docker compose, it is time to create a container for Julia: here is where the magic lies! If you have decided to use VSCode you don’t need to do anything in particular and you can use the default Julia container, but if you have decided to use Atom we will need to create and ad-hoc container. If you have chosen VSCode (the suggested option) you can skip directly to Install and configure VSCode. If you have decided to use Atom, please continue reading this section.
I won’t go into the details of how to write a Dockerfile, but I’ll try to give you a flavour of it, in order to make you understands what’s going on.
Let’s start writing our Dockerfile. First create an empty file, named Dockerfile, then we need to open it and write a script which will build the Docker container.
Create the Dockerfile
In order to have a working Julia environment, we simply need to use the official Julia Docker image, like this
FROM julia:latest
MAINTAINER Aurelio Amerio
Here, on line 1 we select the Julia version we want to use (latest is the latest available version, currently 1.5). Line 2 is not mandatory, but it is useful to write an annotation of who is writing/maintaining the docker image.
Now we need to install a series of Linux packages. In order to be able to connect to the Docker container using Atom/Juno, we need to install and configure an ssh server. Furthermore, I have decided to install also a C++ compiler, as it may/will be useful to have it for future experiments.
#install required packages
RUN apt-get update && apt-get upgrade -y && apt-get install -y \
    apt-utils gcc g++ openssh-server cmake build-essential \
    gdb gdbserver rsync vim locales
RUN apt-get install -y bzip2 wget gnupg dirmngr apt-transport-https \
	ca-certificates tmux && \
    apt-get clean
Here we update the list of the packages and then we install everything we need.
Note that after we have installed all the packages, apt-get clean is issued in order to free space on disk. We should try to delete all the unnecessary files and keep the image as small as possible, when we are building a Docker container.
Now we are ready to setup the ssh server:
#setup ssh
RUN mkdir /var/run/sshd && \
    echo 'root:root_pwd' |chpasswd && \
    sed -ri 's/^#?PermitRootLogin\s+.*/PermitRootLogin yes/' /etc/ssh/sshd_config && \
    sed -ri 's/UsePAM yes/#UsePAM yes/g' /etc/ssh/sshd_config && \
    mkdir /root/.ssh
You should change the root password (root_pwd) on line 3 to something else, for safety reasons. Lines 3-4 are needed to fix permissions.
Now we remove the leftovers and expose the ports of the ssh server and gbd server (c++ debugger):
#remove leftovers
RUN rm -rf /var/lib/apt/lists/* /tmp/* /var/tmp/*

# Expose 22 for ssh server. 7777 for gdb server.
EXPOSE 22 7777
Exposing a port means that I will be able to access services which listen to that port, in particular I will be able to ssh into the container.
Watch Out! Usually, it is not needed to ssh into a container in order to get a bash shell. In this case, an ssh server is only needed because we want to connect to the container using Juno. As a rule of thumb, you shouldn’t install an ssh server into a container, if the container is not an ssh server itself.
We shall now add an user if we need to run a debugger or if we don’t want Julia to run as root (optional)
# add user for debugging
RUN useradd -ms /bin/bash debugger
RUN echo 'debugger:debugger_pwd' | chpasswd
And now we start the ssh server:
CMD ["/usr/sbin/sshd", "-D"]
Notice that we have used CMD and not RUN. RUN commands are run when we build the image (see next paragraph). CMD statements are executed when we launch the container, which means that as soon as we “spin” the container, it will run the CMDcommand. Note that it is possible to issue only one CMD command and that any subsequent CMD command will overwrite the previous ones.
Last but not least, we need to install some locales, in order for our keyboard to work. This step is only needed because we want to use an ssh shell together with tmux (an advanced terminal, persistent through sessions).
#add support for English and Italian
COPY locale.gen /etc/locale.gen
RUN locale-gen
We need to create a file called locale.gen in the same folder where the Dockerfile is placed, containing:
#to support other languages add them to this file

en_US.UTF-8 UTF-8
it_IT.UTF-8 UTF-8
As you can see, you can easily add your language to this list, in order to have it installed on you docker container.
The whole dockerfile should now look like this:
FROM julia:latest
MAINTAINER Aurelio Amerio

########################################################
# Essential packages for remote debugging and login in
########################################################

RUN apt-get update && apt-get upgrade -y && apt-get install -y \
    apt-utils gcc g++ openssh-server cmake build-essential gdb \
    gdbserver rsync vim locales
RUN apt-get install -y bzip2 wget gnupg dirmngr apt-transport-https \
	ca-certificates openssh-server tmux && \
    apt-get clean

#setup ssh
RUN mkdir /var/run/sshd && \
    echo 'root:root_pwd' |chpasswd && \
    sed -ri 's/^#?PermitRootLogin\s+.*/PermitRootLogin yes/' \
    /etc/ssh/sshd_config && \
    sed -ri 's/UsePAM yes/#UsePAM yes/g' /etc/ssh/sshd_config && \
    mkdir /root/.ssh

#remove leftovers
RUN rm -rf /var/lib/apt/lists/* /tmp/* /var/tmp/*

# Expose 22 for ssh server. 7777 for gdb server.
EXPOSE 22 7777

# add user for debugging
RUN useradd -ms /bin/bash debugger
RUN echo 'debugger:debugger_pwd' | chpasswd

########################################################
# Add custom packages and development environment here
########################################################

########################################################

CMD ["/usr/sbin/sshd", "-D"]

#add support for English and Italian
COPY locale.gen /etc/locale.gen
RUN locale-gen
Build a Docker Image
Now that we have written our Dockerfile, it is time to build a Docker image.
Open a terminal in the same directory where the Dockerfile and locale.gen are located (power shell if you are using Windows) and type:
docker build -t julia-container .
Note: run this command with sudo, if you are a Linux user.
Julia contaier may be any name of your choice: it is the name (tag) of the image you are going to build. Take note of it as we will need it later.
This process may take some time, depending on your connection speed. On my pc it takes 20~30 minutes, so this might be the right time to grab a cup of tea!
Did you get your cup of tea? Nice! Now, while we wait for the build to finish, we shall head to the next step and install Atom!
If you don’t want to build the image yourself, I have built it already and uploaded it on docker hub. You can safely skip the building step and download the docker image directly, but you won’t get to change the default root/debugger password. If you plan to use Julia locally on your pc, not changing the default password won’t be a problem.
Install and configure VSCode
To install VSCode, please follow this guide. Once you have installed VSCode it is advisable to install the docker extension to make it easier to manage the Julia container. To do it, open the extension panel (Ctrl+Shift+X), type docker and install the Docker extension (it should be the first result).
We now need to install an extension called Remote - Containers, which you can find in the extension panel. Once you have installed this extension, we can start the Julia container. Make sure that Docker is running, open a shell (the terminal in Unix systems or Power Shell in Windows) and type the following command to create a Julia container:
docker run -it --name julia_docker -v /path/to/shared/folder:/home/julia/project julia:latest
You can choose a name for your container using the --name option: in this case I have decided to name my container julia_docker to make it easier to recognize. Instead of /path/to/shared/folder please choose a path to a folder on your computer which will be shared with the docker container: this way you can share code between the docker machine and your PC. Please note that the local folder will be mounted in the docker container at /home/julia/project, which is what is written after the :. For more informations on how to share volumes with docker, please check the volume documentation page. In my case, for example, I have used /f/Users/Aure/Documents/GitHub/techytok-examples:/home/julia/project. Now your container should be running and you should see the Julia REPL in your current shell window. You can now type exit() to close the REPL and shut down the container.
Connect to the Docker container from VSCode
We can now move back to VSCode. Please open the docker extension (you can do so by clicking on the Docker icon in the toolbar on the left)
![]()
You should now see your container in the top left panel of the docker extension:
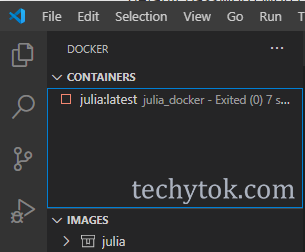
Right click on the container name and select start. You should now see a green icon indicating that the container is running:
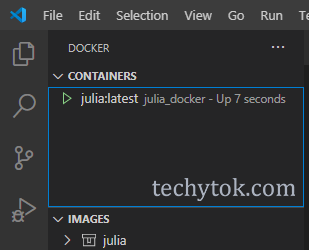
Now click the green button on the bottom left corner of VSCode:

And select Remote - Containers: Attach to Running Container...
A menu should open where you can see the name of your container: click it to connect to your Julia container.

A new VSCode window should open and this editor will run your code inside your docker container. In case it is not enabled, please install again the Julia VSCode extension from the extension panel.
Now you can open the folder where you want to work. Click on File>Open Folder and select/type the path to your working directory (in this case /home/julia/project).
We can now browse the project folder (which is the folder which is shared between your PC and the docker container) and create a test file.
Let’s create a Julia file and type:
if Sys.islinux()
    print("Hello, this is TechyTok")
end
This is a simple check to test if the system (the docker container) is using Linux. If everything is setup correctly (and you are not using Windows containers), this should print Hello, this is TechyTok in the REPL.
Now you can start developing like you normally would with VSCode and everything will run inside the container!
Please note that this procedure can be adapted to work with WSL containers or machines which you can access through SSH, the only difference is that you will need to install Remote - WSL or Remote - SSH to connect to the machine.
In the remaining part of this lesson we will deal with installing and setting up Atom. You can directly jump to the conclusions section of the guide.
Install Atom

Atom is a hackable text editor for the 21st Century!
It is basically a text editor with support for syntax highlighting and open source plugins. It is made by Github (for reference, this website is hosted at Github Pages) and it offers great flexibility: there is a set of plugins to create an IDE for almost any programming languages!
You can download Atom from here. There is not much to say about it, as there is not even anything to configure while installing it, just go through the installer!
Install and configure Juno IDE
To install Juno, open a command prompt and type the following command:
apm install uber-juno
Otherwise, you can install it graphically from the install option in the file→settings menu in Atom.
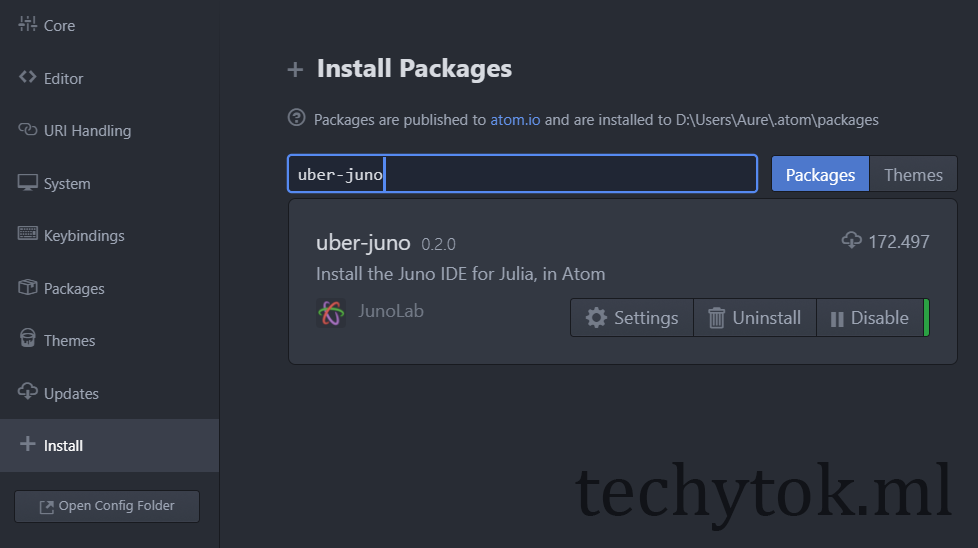
Now we have to install the package ftp-remote-edit by typing the following command into a command prompt:
apm install ftp-remote-edit
We shall now proceed to setup Juno and ftp-remote-edit.
First open the file→settings menu in Atom and click on packages. Now search julia-client
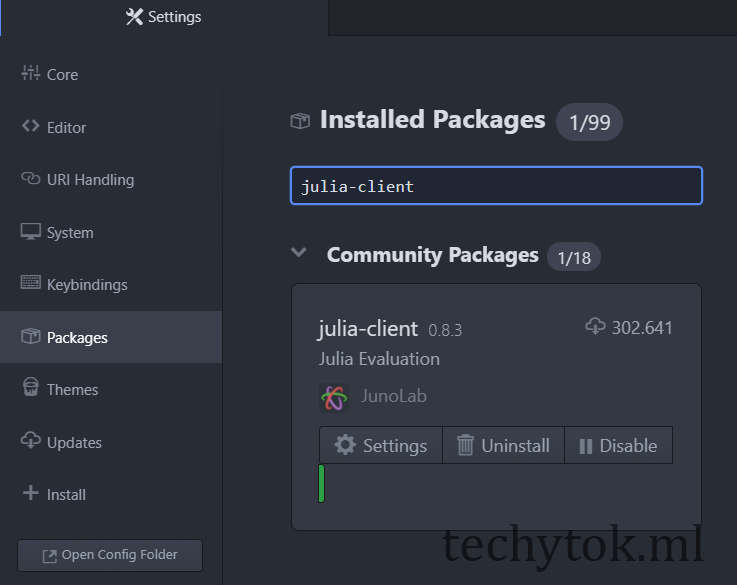
and click Settings.
Scroll to the section called Remote Options and set the path to the Julia binary (see figure)
/usr/local/julia/bin/julia
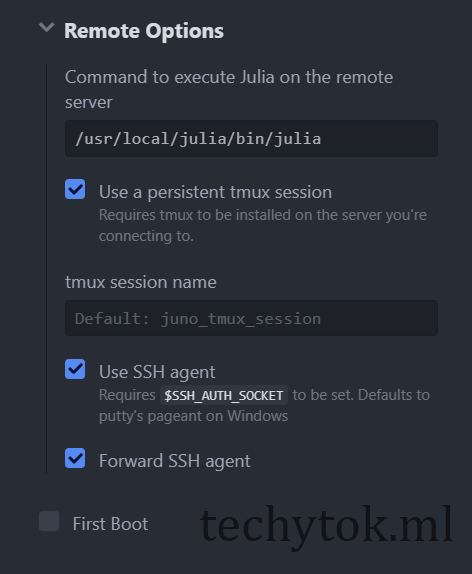
and tick Use a persistent tmux session, Use ssh agent and Forward SSH Agent.
Now hit ctrl+space in order to open the ftp-remote-edit menu. You will be asked to set a password. You should remember that password as it will be used to secure the credentials of you ssh logins.
Right click on the new tab in order to open the context menu:
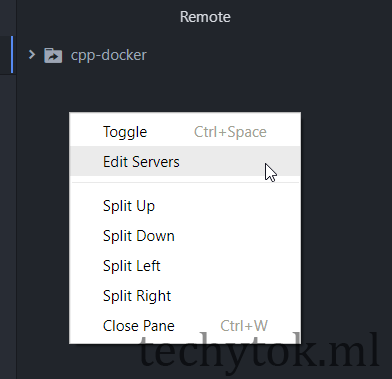
and click edit servers.
You should be able to create a new server. Compile the module with the following settings:
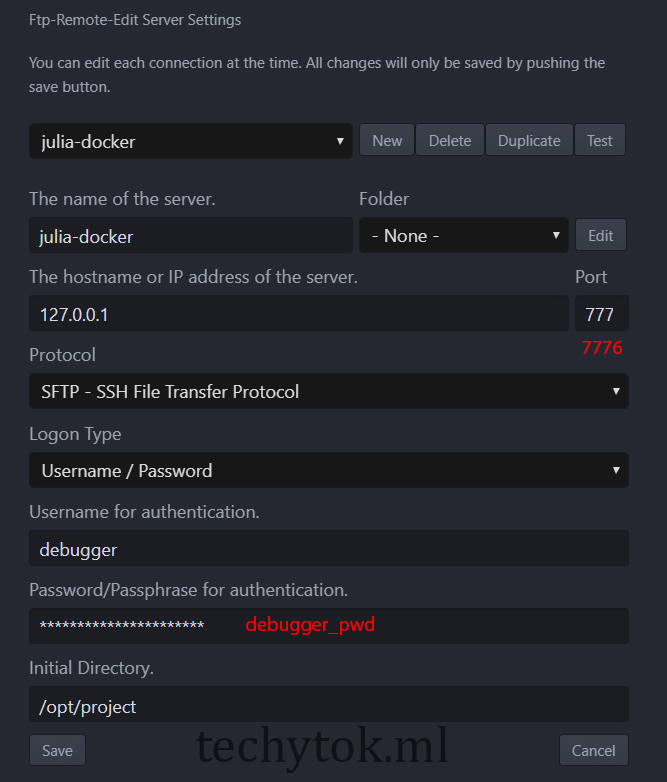
- IP: 127.0.0.1
- Port: 7776 (can be changed)
- Username: debugger (or root)
- Password: the password for the debugger user (
debugger_pwdif you have built the image following the tutorial or you are using my remote image) - Initial Directory: /opt/project
Now it is time to connect Juno to the docker image!
Connect to the Docker container from Atom
If you have reached this point and the build of your Docker image is finished (or you have chosen to use my remote image), you are almost ready to go!
Now you can either create a docker compose project visually with DockStation, if you have installed it, or skip this step and use the configuration file which is provided at the end of this paragraph.
First we need to start DockStation. If you are using DockStation version >1.5, you will be prompted to create an account (for free) or use it as guest. It is your choice, it will work fine in guest mode too.
Add a new project:
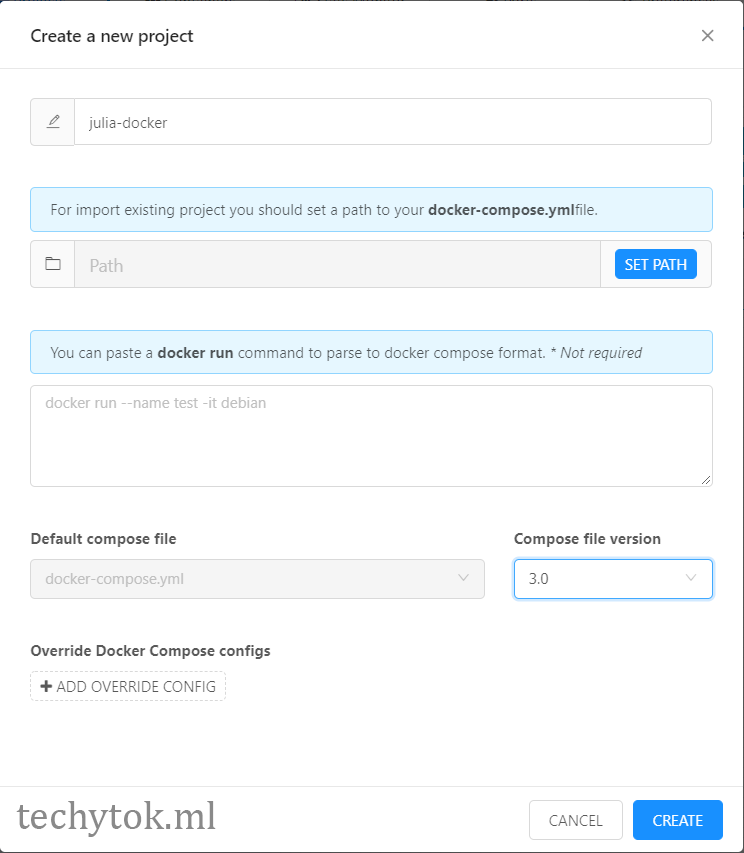
… and set the path to your project directory.
Watch Out! You can either choose the path to where your code is stored or another folder. It is a good idea to set the path to the root of your Julia project. For example, a good working directory may be a new folder called julia-projects in your documents folder!
Once you have created the project you need to add some containers to it. You can either add local or remote containers. A local container is the one you have built before with the docker build command, a remote container is a container which is hosted on docker hub. We will now use the container which is hosted on my docker repository for simplicity’s sake. You can even create a docker repository yourself for free and link it to your Github account, so that you can build docker images completely online, but this is beyond the scope of this tutorial. If you want to learn how to build an image automatically from a Dockerfile hosted at Github, please refer to this guide!
Type in the search box “aureamerio” and look for “techytok-examples”
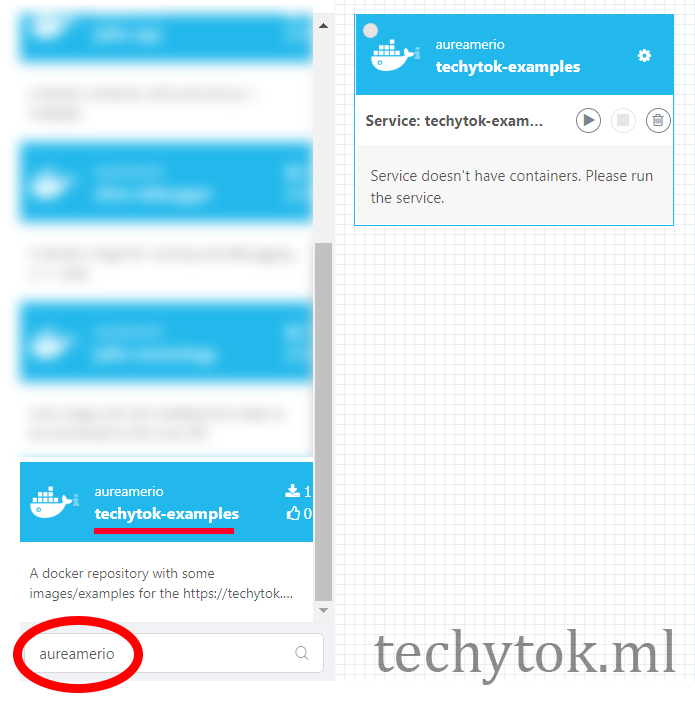
Drag and drop the image into the region on the right. Select julia-docker as the tag.
Watch Out! Currently DockStation doesn’t select the tag properly, so we have to make sure that the tag is correctly chosen manually.
Click on the EDITOR tab (top right) and edit the config file to make it look like this:
version: '3'
services:
  julia-docker:
    image: aureamerio/techytok-examples:julia-docker
… and hit save.
Click now on the GENERAL tab and press START on the top left (see image)
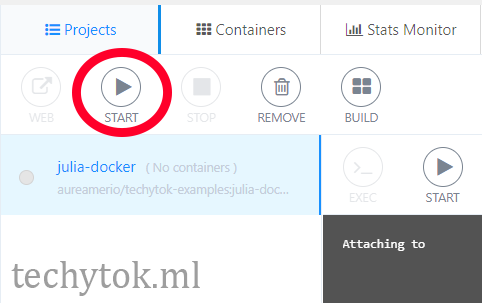
Once it has started and it has downloaded the image, you can stop the container. Now DockStation has detected the settings of the container and you can fiddle with the volumes and ports.
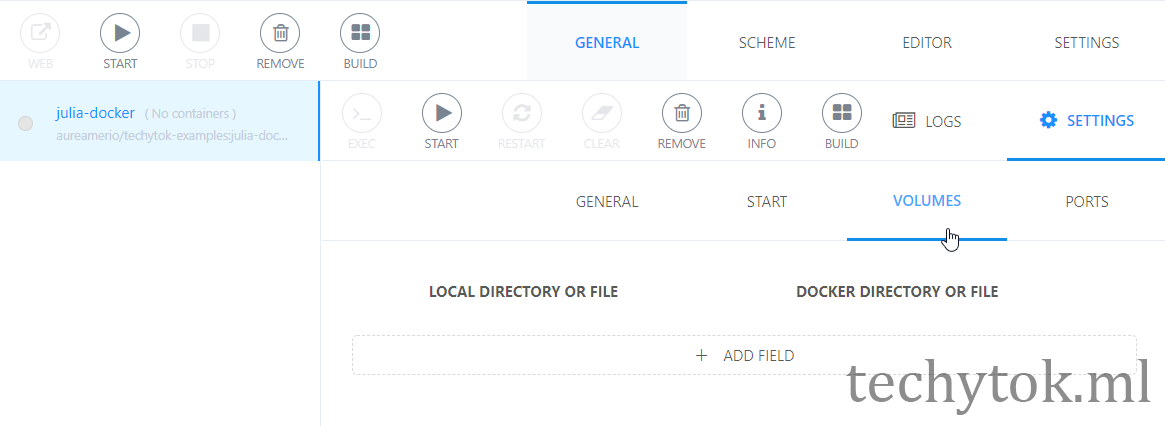
We need to mount the directory where we intend to store our code inside the Docker container. To do so, we use the VOLUME option.
Go to the General→Settings→Volume tab, click ADD FIELD and type /opt/project as the docker directory and ./ as local directory. The Docker container will now see the new folder /opt/project, which is linked to the local directory. Everything which is contained in the aforementioned folder will be modifiable by both the Docker container and your local machine and the content will be synced.
Write the path to your project directory instead of ./ , if your DockStation project directory doesn’t coincide with the directory containing your Julia code.
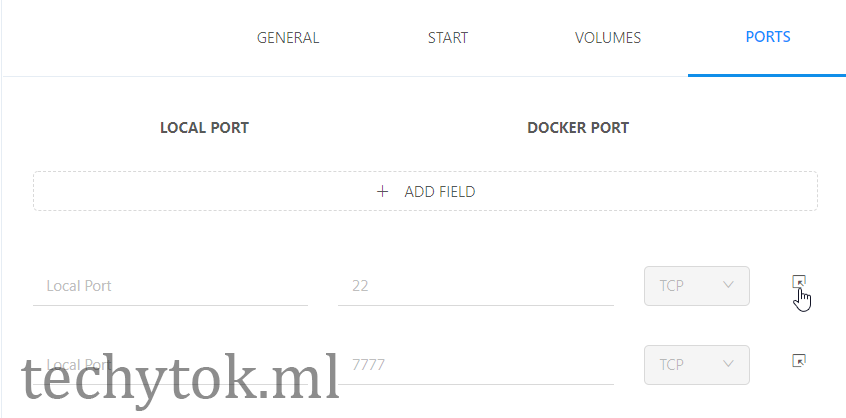
Now head to the PORTS tab, click on the two icons in figure:
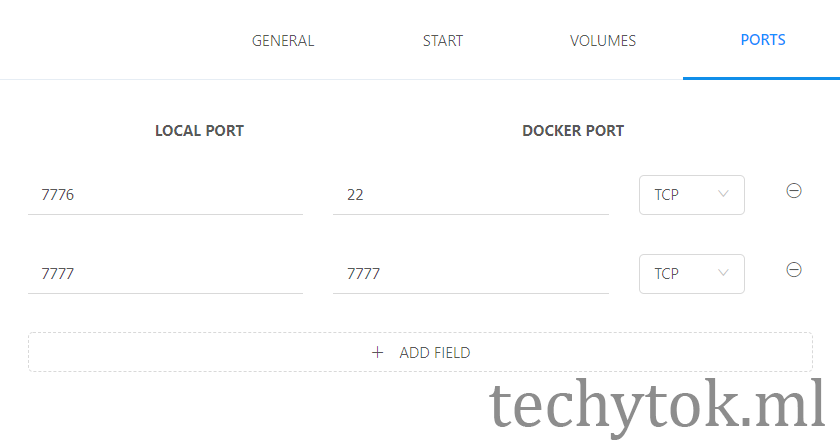
and set the local ports as following:
- 22 goes to 7776 (or the port you have set in ftp-remote-edits)
- 7777 goes to 7777 (or whichever port you desire the c++ debugger points to, for this example it doesn’t matter)
Now you are ready to spin your docker container! Press START and… done! Let’s get back to Atom!
Watch Out! If asked, you should give Docker permission to share the required drive.
For Windows users: If you have kaspersky, or another antivirus with a firewall, you may have to remove filtering on tcp port 445 locally. See this post for more informations.
Docker compose file
If you did everything right, you should now have a file called docker-compose.yml in your project folder with the following content:
version: '3'
services:
  julia-docker:
    image: aureamerio/techytok-examples:julia-docker
    ports:
      - '7776:22'
      - '7777:7777'
    volumes:
      - './:/opt/project'
If you don’t want to use DockStation, you can start the container by:
- opening a terminal (power shell)
- changing directory to the one which contains the
docker-compose.ymlfile - typing the command
docker-compose up
Connect to Docker
Now that docker is running, we shall go back to Atom, open the ftp-remote-edit tab (ctrl+space) and click on julia-docker.
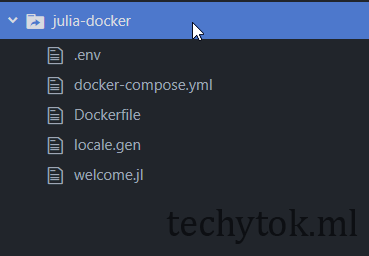
If you did everything correctly, now you should see the content of your current project folder.
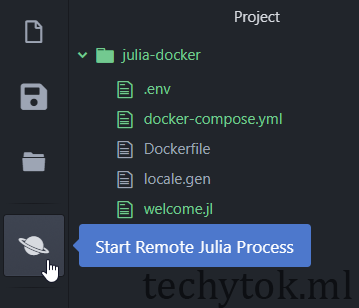
Now you can click on the Planet-like icon on the left-side palette in order to start a remote kernel (your docker kernel!)
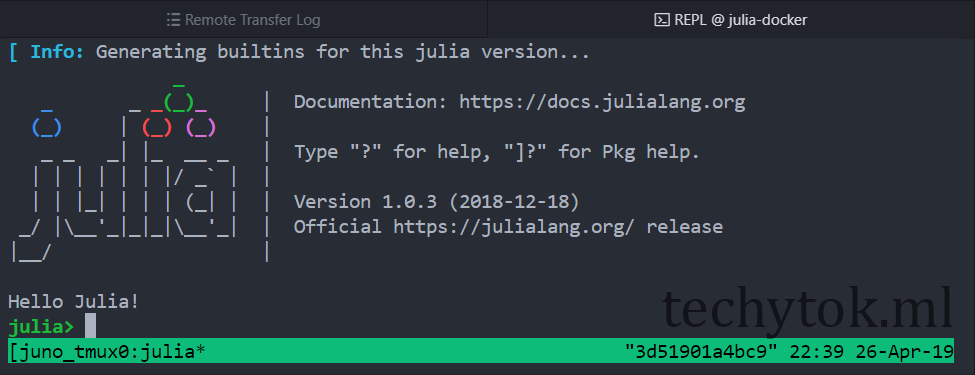
You can test your installation by creating a simple hello Julia script called welcome.jl containing:
print("Hello Julia!")
and press shift+enter.
Julia will download some initial packages and compile them. After that, you should see the Julia logo and a warm welcome!
Conclusions
You have successfully set up Julia to work with a Docker container. Now, when you want to start coding with Julia, you simply need start your containers and connect to them using VSCode or Atom and the Juno IDE.
You can find all the code for this tutorial at http://bit.ly/julia-docker-repo and the docker hub repository at http://bit.ly/julia-docker-hub
If you liked this guide and you would like to receive further updates on what is being published on this website, I encourage you to subscribe to the newsletter! If you have any question or suggestion, please post them in the discussion below!
Thank you for reading this guide and see you soon on TechyTok!


Leave a comment